Installation Guide
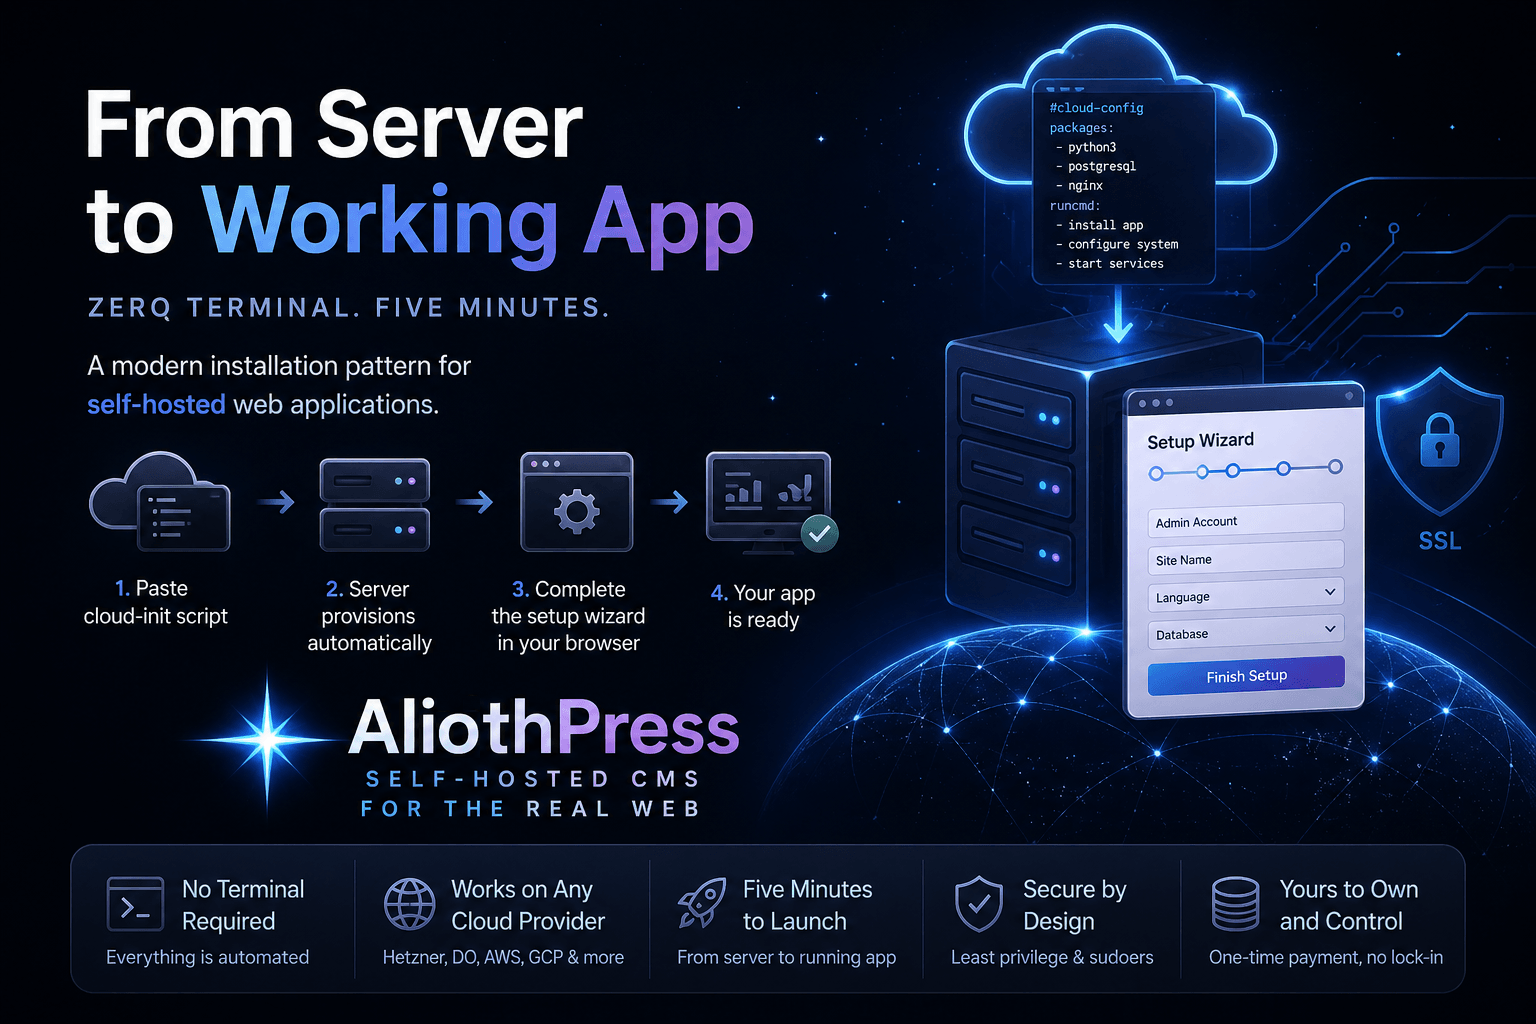
What You Need
✅ You need
- Cloud hosting account
- Domain
- 5 minutes of your time
❌ You don’t need
- Terminal or command line
- Coding skills
- Server experience
Supported Hosting Providers
AliothPress works on any cloud hosting provider that supports Ubuntu and Cloud-Init. Here are the tested and recommended providers:
| Provider | Locations | Cloud-Init field |
|---|---|---|
| Hetzner Cloud | EU, US, Asia | "Cloud config" |
| DigitalOcean | Worldwide | "Advanced Options" → "User Data" |
| Linode (Akamai) | Worldwide | "Add User Data" |
| Vultr | Worldwide | "User Data" checkbox |
💡 The installation process is the same on every provider: create a server, paste the script, open your browser. This guide uses Hetzner Cloud as an example, but the steps are nearly identical everywhere.
🌍 You can use any hosting provider you like — the ones listed above are simply the most popular and well-tested options. If your provider supports Ubuntu and Cloud-Init, AliothPress will work.
How to Choose a Server
When creating a server, every provider will ask you to choose a plan (size). The plan determines how much CPU, RAM, and disk space your server has. Here’s what AliothPress needs:
| Plan | vCPU | RAM | Disk | Good for |
|---|---|---|---|---|
| Standard | 2 | 4 GB | 80 GB | Most sites: moderate content and images |
| For heavy use | 4 | 8 GB | 160 GB | Frequent posting, many images, a large growing archive, or PostgreSQL |
Disk usage grows with images and logs. On most providers you can increase the disk later without recreating the server, so start comfortable and resize when needed.
Why does AliothPress need 4 GB RAM?
When you upload an image, AliothPress automatically creates optimized versions in modern formats (WebP and AVIF) at multiple sizes, plus social media crops. This image processing is the most memory-intensive operation.
💡 Hetzner offers the best value for European users. For US-based sites, DigitalOcean and Vultr have more US data centers.
⚠️ Start from 4 GB RAM and go higher based on your content. AliothPress does heavy image processing, so very small servers can struggle.
Step-by-Step Installation
This guide uses Hetzner Cloud as an example. If you use a different hosting provider, the overall process is the same — only the names of the options may differ slightly.
Step 1. Create a Hetzner Account
Go to hetzner.com/cloud and click “Register”. Enter your email, create a password, and verify your email. You will need to add a payment method (credit card or PayPal).
After registration, you will see your Project dashboard. Click “+ Create Server”.
✅ You are now on the server creation page. Follow the sections below from top to bottom.
Step 2. Configure Your Server
The server creation page has several sections. Here is exactly what to do in each one:
Location
You will see a map of server locations: Nürnberg, Falkenstein, Helsinki, Singapore, Hillsboro, Ashburn.
Click the location closest to your audience. If your visitors are mostly in Europe, choose Nürnberg or Helsinki. For the US, choose Ashburn or Hillsboro.
💡 If you’re unsure, Helsinki or Nürnberg are great all-around choices for Europe.
Image
You will see two tabs: “OS Images” and “Apps”. Make sure “OS Images” is selected.
Click on Ubuntu. In the version dropdown below it, select the latest LTS version (26.04 or newer). This should already be the default.
⚠️ Do not select Fedora, Debian, CentOS, or any other system. AliothPress requires Ubuntu 22.04 LTS or newer.
Type
You will see two categories: “Shared Resources” and “Dedicated Resources”.
Under Shared Resources, you will see two categories that work with AliothPress. Choose a plan with at least 2 vCPUs and 4 GB RAM:
- Cost-Optimized — older hardware with limited availability, often sold out. Only worth trying for testing.
- Regular Performance — newer hardware with stable availability. Recommended for all real sites.
💡 Plan names and prices change over time. Look for the specs (vCPU, RAM, disk) rather than the exact plan name.
Networking
Leave everything as default:
- Public IPv4 — checked ✅
- Public IPv6 — checked ✅
- Private Networks — unchecked
💡 IPv4 is required — it gives your server a public address like 203.0.113.42 that you can open in a browser.
SSH-Keys
- If you already have an SSH key listed, select it to secure your server.
- f you don’t have a key yet, you can create one now by clicking "Add SSH Key" and following the on-screen instructions (this is the recommended, most secure method).
- Alternatively, you can skip this step. Hetzner will generate a temporary root password and send it to your email.
Sections to Skip
The following sections can be left empty — no action needed:
| Sections | |
|---|---|
| Volumes | Skip — not needed |
| Backups | Optional — adds 20% to the price. Nice to have, not required. |
| Placement groups | Skip — this is for advanced multi-server setups |
| Labels | Skip — just organizational tags |
Setting Up a Firewall
A firewall protects your server by blocking unwanted connections. You only need to allow three ports.
How to create a firewall:
- In the Hetzner dashboard, click “Firewalls” in the left menu (under Cloud).
- Click “Create Firewall”.
- Add three Inbound Rules by clicking “+ Add Rule”.
- Leave the Outbound section empty — all outgoing traffic is allowed by default.
- Give the firewall a name (e.g., “web-server”) and click “Create Firewall”.
| What it does | Port | Settings |
|---|---|---|
| SSH (server management) | 22 | TCP, Any IPv4 + Any IPv6 |
| HTTP (your website) | 80 | TCP, Any IPv4 + Any IPv6 |
| HTTPS (secure website) | 443 | TCP, Any IPv4 + Any IPv6 |
Step 3. Paste the Installation Script
This is the most important step! Scroll down to the section called “Cloud config”. It is near the bottom of the page, right above the “Name” field.
You will see a text field with the placeholder text “Cloud-init configuration”.
What to do:
- Find the file called cloud-init.sh in your AliothPress folder (the one you downloaded).
- Open it with any text editor (Notepad on Windows, TextEdit on Mac).
- Select all text: press Ctrl+A (or Cmd+A on Mac).
- Copy: press Ctrl+C (or Cmd+C on Mac).
- Click inside the Cloud config text field on the Hetzner page.
- Paste: press Ctrl+V (or Cmd+V on Mac).
⚠️ Make sure you paste the ENTIRE content of the file. The first line must be #!/bin/bash — if you see it in the text field, you did it right.
Step 4. Name Your Server and Create It
Below Cloud config, you will see the “Name” field. Type any name for your server, for example “mysite”. This is just for your reference in the Hetzner dashboard.
Click the button “Create & Buy now”.
✅ Your server is being created! Hetzner will show a progress indicator. Wait about 2–3 minutes.
Step 5. Open Your Site
After the server is created, Hetzner will show you the server details page with the IP address (it looks like 203.0.113.42 or similar).
What to do:
- Copy the IP address from the Hetzner dashboard.
- Open your web browser.
- Paste it into the address bar, add http:// in front, and press Enter: http://YOUR-SERVER-IP.
Example: http://203.0.113.42
⚠ Make sure the address starts with http:// (not https://). Your server does not have an SSL certificate yet, and most browsers will otherwise default to https:// — which would show a 404 error instead of the Setup Wizard. Also, the page won’t open right away — this is normal. The server needs 1–2 minutes to finish installing AliothPress. Wait a moment, then refresh. If you see “Connection refused” or a blank page, just wait a bit longer and try again.
You might see the following while waiting:
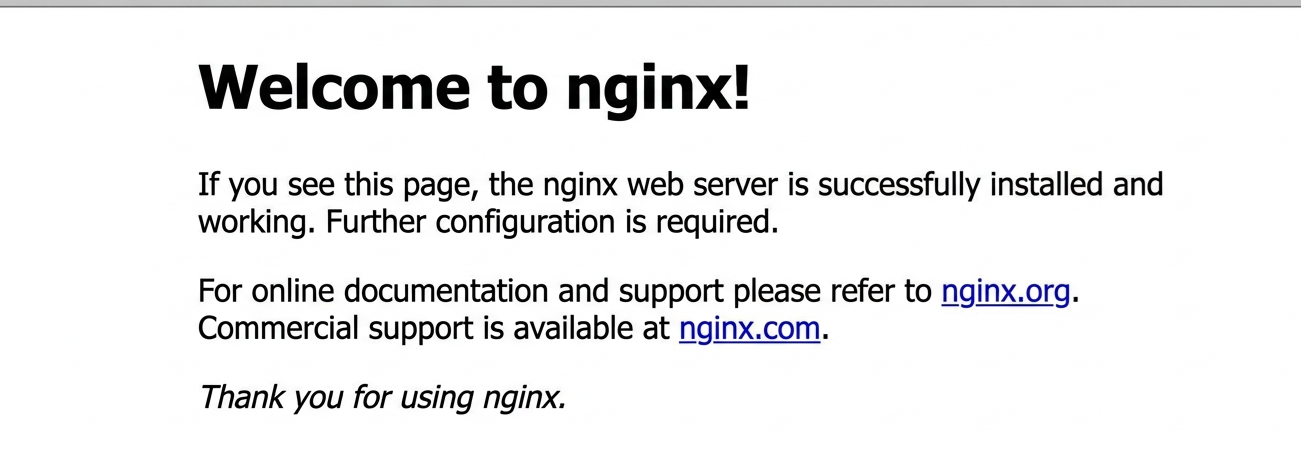
This is normal — it means your server is already responding, but AliothPress is still being configured. Wait a few minutes and refresh the page.
You will see the AliothPress Setup Wizard — a friendly form where you:
🌍 Choose your language — 31 languages available
🗄️Choose a database — SQLite or PostgreSQL
👤Create your admin account — pick a username, email, and password
✏️Name your site and optionally enter your license key
Click “Launch Your Site!” and you’re done.
✅ Congratulations! Your site is live! You can now log into your admin panel at http://[YOUR-SERVER-IP]/admin/ and start creating content.
After Installation
Connecting Your Domain
Right now, your site is accessible via its IP address (e.g., http://203.0.113.42). To use your own domain name (e.g., mysite.com), you need to create two DNS records that point your domain and its www-variant to the server.
🌍 You can use any domain registrar — Porkbun, Namecheap, Cloudflare, GoDaddy, Squarespace Domains, or any other. The process is the same everywhere: you create an A record pointing to your server’s IP address, plus a CNAME record for www pointing to your root domain. The screenshots below use Porkbun as an example, but your registrar will have a very similar interface.
Step-by-step (example: Porkbun)
Here is what the DNS settings page looks like on Porkbun. Your registrar will have a very similar form:
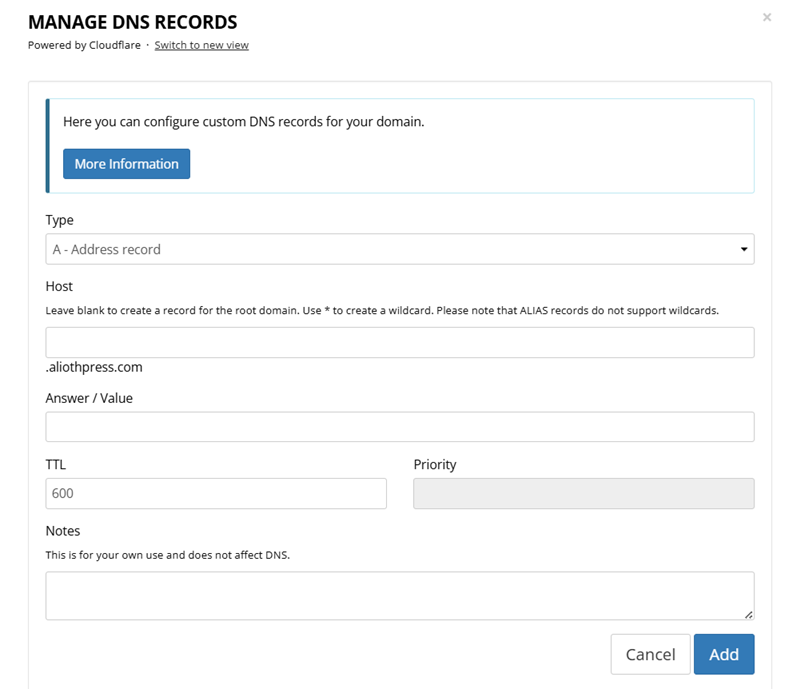
- Log in to your domain registrar (where you bought the domain).
- Find “DNS Settings” or “Manage DNS Records”. On Porkbun, click the “DNS” button next to your domain.
- Create two DNS records — both are required.
- Click “Add” (or “Save” on other registrars).
- Wait 5–30 minutes for the DNS to update.
- Open http://mysite.com in your browser — your site should be there!
A - Address record
| Field | Value | Explanation |
|---|---|---|
| Type | A - Address record | Record 1 of 2: points your root domain to the server IP |
| Host | (leave blank) | Blank = root domain (e.g., mysite.com) |
| Answer / Value | Your server IP | e.g., 203.0.113.42 — copy from Hetzner |
| TTL | 600 | How quickly changes take effect (600 = 10 min) |
CNAME - Alias record
| Field | Value | Explanation |
|---|---|---|
| Type | CNAME - Alias record | Record 2 of 2: points the www-variant to the same place |
| Host | www | Creates www.mysite.com as an alias |
| Answer / Value | Your domain | e.g., mysite.com (your own domain, without www) |
| TTL | 600 | Same as above (600 = 10 min) |
⚠️ Until you enable HTTPS (next section), always use http:// when opening your domain. Most browsers will otherwise default to https://, which will show a 404 error because your server does not have an SSL certificate yet.
Enabling HTTPS (Free)
HTTPS makes your site secure and shows a lock icon 🔒 in the browser. Visitors trust sites with HTTPS more, and search engines rank them higher.
The good news: AliothPress has a built-in HTTPS setup. You don’t need to install anything or use the command line. It uses Let’s Encrypt — a free, trusted certificate provider.
Here is what the Domain & HTTPS settings look like in the AliothPress admin panel:
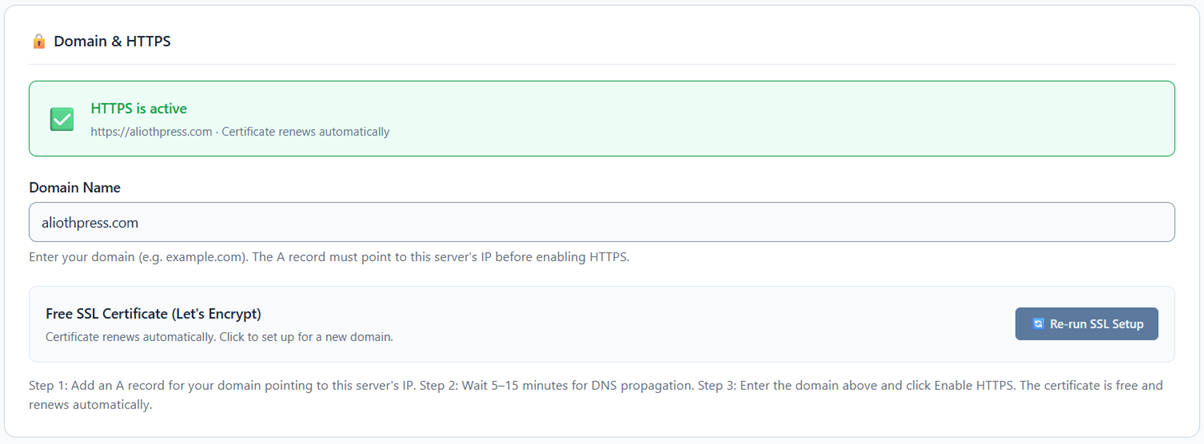
How to enable HTTPS:
- Make sure your domain is already connected (Step above) and loads your site via http://mysite.com.
- Log into your AliothPress admin panel.
- Go to Settings → Domain & HTTPS.
- Enter your domain name (e.g., mysite.com) in the Domain Name field.
- Click the “Enable HTTPS” button. That’s it!
✅ Your site is now running on HTTPS. The certificate is free and renews automatically — you never have to think about it again.
⚠️ HTTPS will only work after your domain’s DNS is fully set up and the domain loads your site. If you get an error, wait a few more minutes and try again.
⚠️ After enabling HTTPS, your site will only be accessible via your domain name. The old IP address (e.g., http://203.0.113.42) will stop working. To access your admin panel, go to https://yourdomain.com/admin.
License Key
AliothPress is free for non-commercial use — personal websites, blogs, educational projects, non-profits, and hobby projects. No license key is needed. The only requirement is that the “Powered by AliothPress” attribution link remains visible in the footer and system emails.
A license key is required for commercial use — business websites, online stores, paid services, lead generation, advertising, or client projects. Each license key is valid for one domain.
With an active license key:
- The “Powered by AliothPress” attribution is removed from the footer and emails
- Automatic updates become available
You can enter your license key during setup (step 4 of the wizard) or later in Settings → License & Updates. The license can be activated at any time.
💡 Web agencies: you may use AliothPress for client projects, but each client domain requires its own license key. See the End-User License Agreement for full terms.
Updating AliothPress
With an active license: go to Settings → License & Updates, click “Check for Updates”. If a new version is available, click “Update Now” — everything happens automatically.
Troubleshooting
Here are solutions to the most common issues:
| Problem | Solution |
|---|---|
| Site doesn’t load after creating server | Wait 3 minutes and refresh. The installation needs a moment to complete. |
| “Connection refused” error | The installation is still running. Wait 2 more minutes and try again. |
| White page or error page | Try clearing your browser cache, or open in a private/incognito window. |
| Domain doesn’t show your site | DNS changes can take up to 30 minutes. Wait and try again. Make sure both the A record and the CNAME for www point to the correct IP/domain. |
| Browser forces HTTPS and won’t open http://your-domain | Your browser has cached an HTTPS policy for this domain from a previous install. Open the site in a private/incognito window or use a different browser to access your site via http:// for the initial setup. |
| HTTPS error or “Enable HTTPS” fails | Your DNS must be fully active first. Wait 15–30 minutes after setting both DNS records (A and CNAME), then try again. The error message will tell you exactly which record needs attention. |
| Want to start over | Delete the server in your hosting dashboard and create a new one. The cloud-init script will install everything fresh. |
Cloud-Init on Other Providers
If you’re using a provider other than Hetzner, the installation process is the same. The only difference is where you paste the cloud-init script and which plan to choose. Here’s a quick reference:
| Provider | Look for plan | Where to paste the script |
|---|---|---|
| Hetzner Cloud | ≥ 2 vCPU, 4 GB | Scroll down → “Cloud config” → paste |
| DigitalOcean | ≥ 2 vCPU, 4 GB | “Advanced Options” → check “User Data” → paste |
| Linode (Akamai) | ≥ 2 vCPU, 4 GB | “Add User Data” section → paste |
| Vultr | ≥ 2 vCPU, 4 GB | “User Data” → check the box → paste |
💡 On every provider, make sure to select Ubuntu 22.04 LTS or newer as the operating system, and choose a server with at least 2 vCPUs and 4 GB RAM. See the “How to Choose a Server” section at the beginning of this guide for details.
Enjoy building with AliothPress! 🌿